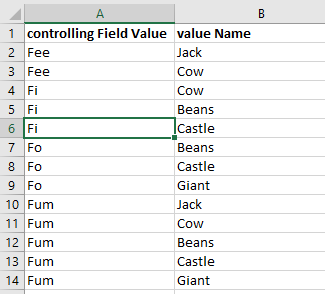
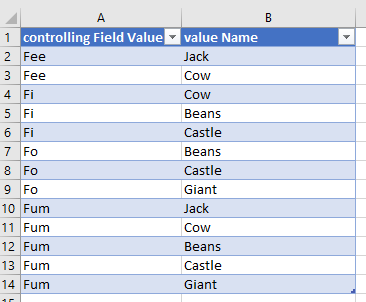
The goal is to take a spreadsheet like this…
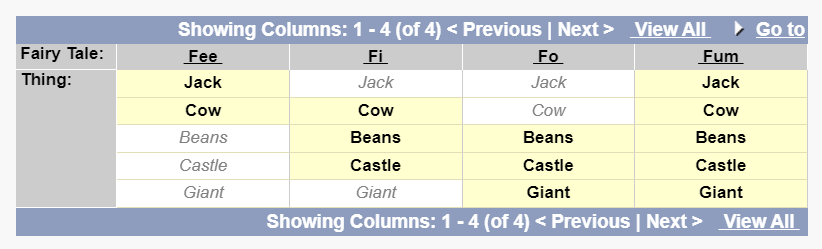
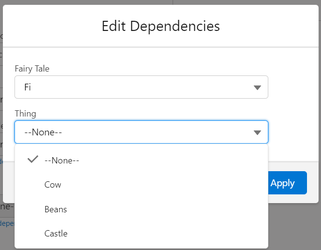
…and turn it into this Salesforce Dependency Picklist:
Strategy Overview
- Step 1: Create XML Map in Excel using Template.
- Step 2: Create an Excel worksheet that has two columns (controllingFieldValue and valueName).
- Step 3: Export into simplified XML format.
- Step 4: Transform the simplified XML format into SFDX source format.
- Step 5: Push the updated metadata file (“Thing__c.field-meta.xml”) into Salesforce using SFDX.
Step 1: Create XML Map in Excel using Template
Excel can import metadata files from the SFDX but not export them in the same format. However, it is capable of exporting in a simplified XML format if it’s given an XML map.
- Create the following simplified XML file in Notepad with the file name and extension: “Picklist_ExcelSimpleMap.xml”. This simple template file is used to help Excel create the desired Schema, so copy it over exactly:
<?xml version='1.0' encoding='UTF-8'?>

<dataset>

<record>

<controllingFieldValue>foo1</controllingFieldValue>

<valueName>bar1</valueName>

</record>

<record>

<controllingFieldValue>foo2</controllingFieldValue>

<valueName>bar2</valueName>

</record>

</dataset>
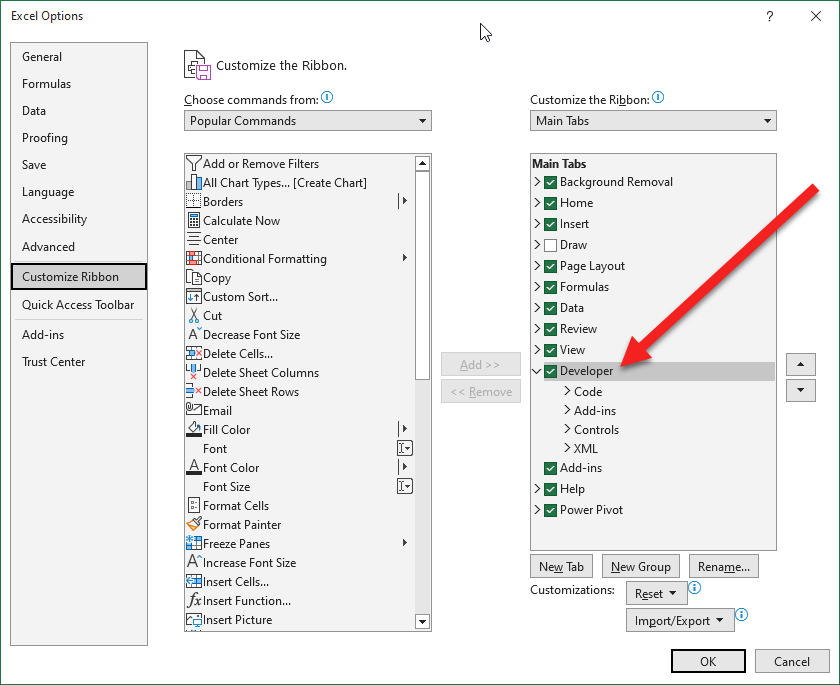
- Enable the Developer menu in Excel.
- File: Options: Customize Ribbon: enable Developer
- File: Options: Customize Ribbon: enable Developer
Step 2: Create an Excel worksheet that has two columns (controllingFieldValue and valueName)
- Create a spreadsheet with two columns and all the combinations the business wants loaded into Salesforce.
- Add the simplified XML template (Picklist_ExcelSimpleMap.xml) into Excel as an XML map, using the following steps.
- Developer: Source: XML Maps: Add: select the file you created earlier (“Picklist_ExcelSimpleMap.xml”)
- Allow Excel to create the Schema.
- Map the XML elements to the Excel Columns.
- Click and drag controllingFieldValue from the XML Source sidebar to cell A:1.
- Repeat for valueName to cell B:1.
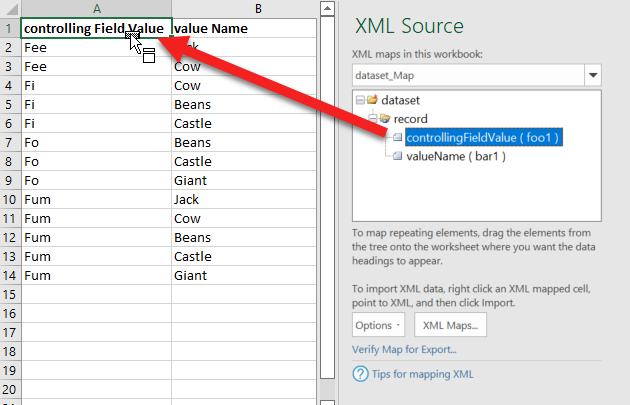
- Check that the columns are successfully mapped — they should show alternating rows.
Step 3: Export into simplified XML format
- Click anywhere in the table and select Developer: Export: save into another file like Picklist_JackSimple.xml.
- This will export in a format with one record for each row in Excel.
i. Example: Picklist_JackSimple.xml
<?xml version="1.0" encoding="UTF-8" standalone="yes"?>

<dataset xmlns:xsi="http://www.w3.org/2001/XMLSchema-instance">

<record>

<controllingFieldValue>Fee</controllingFieldValue>

<valueName>Jack</valueName>

</record>

<record>

<controllingFieldValue>Fee</controllingFieldValue>

<valueName>Cow</valueName>

</record>

<record>

<controllingFieldValue>Fi</controllingFieldValue>

<valueName>Cow</valueName>

</record>

<record>

<controllingFieldValue>Fi</controllingFieldValue>

<valueName>Beans</valueName>

</record>

<record>

<controllingFieldValue>Fi</controllingFieldValue>

<valueName>Castle</valueName>

</record>

<record>

<controllingFieldValue>Fo</controllingFieldValue>

<valueName>Beans</valueName>

</record>

<record>

<controllingFieldValue>Fo</controllingFieldValue>

<valueName>Castle</valueName>

</record>

<record>

<controllingFieldValue>Fo</controllingFieldValue>

<valueName>Giant</valueName>

</record>

<record>

<controllingFieldValue>Fum</controllingFieldValue>

<valueName>Jack</valueName>

</record>

<record>

<controllingFieldValue>Fum</controllingFieldValue>

<valueName>Cow</valueName>

</record>

<record>

<controllingFieldValue>Fum</controllingFieldValue>

<valueName>Beans</valueName>

</record>

<record>

<controllingFieldValue>Fum</controllingFieldValue>

<valueName>Castle</valueName>

</record>

<record>

<controllingFieldValue>Fum</controllingFieldValue>

<valueName>Giant</valueName>

</record>

</dataset>
Small victory time! You have successfully exported an Excel file into an XML format! Unfortunately, this format cannot be directly uploaded into Salesforce, as it is not in Source Format.
- This will export in a format with one record for each row in Excel.
Step 4: Transform the simplified XML format into SFDX source format
DX Source Format for Picklists
Look at any field with a controlling picklist; the format should look similar.
<?xml version="1.0" encoding="UTF-8"?>

<CustomField xmlns="http://soap.sforce.com/2006/04/metadata">

<fullName>Thing__c</fullName>

<externalId>false</externalId>

<label>Thing</label>

<required>false</required>

<trackTrending>false</trackTrending>

<type>Picklist</type>

<valueSet>

<controllingField>Fairy_Tale__c</controllingField>

<restricted>true</restricted>

<valueSetDefinition>

<sorted>false</sorted>

<value>

<fullName>Jack</fullName>

<default>false</default>

<label>Jack</label>

</value>

</valueSetDefinition>

<valueSettings>

<controllingFieldValue>Fee</controllingFieldValue>

<controllingFieldValue>Fum</controllingFieldValue>

<valueName>Jack</valueName>

</valueSettings>

<valueSettings>

<controllingFieldValue>Fee</controllingFieldValue>

<controllingFieldValue>Fi</controllingFieldValue>

<controllingFieldValue>Fum</controllingFieldValue>

<valueName>Cow</valueName>

</valueSettings>

</valueSet>

</CustomField>
The critical point is that every value name is listed only once and is surrounded by the “valueSettings” tags (lines 20-30). Within this element is a list of “controllingFieldsValue” elements. The next hurdle is to transform the “Picklist_JackSimple.xml” file into this format. We will only create the ValueSettings piece of this file to simplify our process with an XML transformation.
Enter XML Transformations
XSLT is a language many Salesforce developers have not used, so I’ve created a simple transformation that will produce your desired results. First, we’ll install a VS Code Extension called XSLT/XPath to run the transformation. Before proceeding to the transformation steps, take some time to familiarize yourself with how this extension works and how to run the XSLT file.
- Extension Overview: https://deltaxml.github.io/vscode-xslt-xpath/
- Running Transformations Overview: Running XSLT
- There are four key files:
- Source: your simplified XML file (“Picklist_JackSimple.xml”)
- XSLT: the file that does the transformation (“picklistTransformation.xslt”)
- output: defaults to xslt-out/results1.xml
- tasks.json: instructions for VS code, on how to find the above files.
Transformation Steps
- Install and configure the following prerequisites:
- VS Code Extension “XSLT/XPath for Visual Studio Code” https://deltaxml.github.io/vscode-xslt-xpath/
- Saxon for Java — see setup on the extensions page: https://deltaxml.github.io/vscode-xslt-xpath/run-xslt.html
- Run the “Tasks: Configure Default Build Task,” and select one of the two options. This will create tasks.json in the .vscode folder.

- Create the following XSLT file in Notepad with the filename “picklistTransformation.xslt”
<xsl:stylesheet version=”1.0” xmlns:xsl=”http://www.w3.org/1999/XSL/Transform” xmlns:msxsl=”urn:schemas-microsoft-com:xslt” exclude-result-prefixes=”msxsl”>

<xsl:output method=”xml” indent=”yes”/>

<xsl:template match=”/”>

<xsl:for-each-group select=”dataset/record” group-by=”valueName”>

<xsl:sort select=”valueName”/>

<valueSettings>

<valueName>

<xsl:value-of select=”valueName”/>

</valueName>
<xsl:for-each select=”current-group()”>
<controllingFieldValue>
<xsl:value-of select=”controllingFieldValue”/>
</controllingFieldValue>
</xsl:for-each></valueSettings>
</xsl:for-each-group>
</xsl:template>
</xsl:stylesheet>A few explanations:
- Line 4: declares that this is an XML to XML transformation.
- Line 6: creates a “grouping” for each of our value’s names.
- Line 13: for each valueName grouping, loops through all the values and outputs the controlling values for each.
- Edit the tasks.json file to provide locations for xsltFile and xmlSource.

- Run “Tasks: Run Tasks” using the command palette. This will output the following result1.xml
<?xml version="1.0" encoding="UTF-8"?>

<valueSettings>

<valueName>Beans</valueName>

<controllingFieldValue>Fi</controllingFieldValue>

<controllingFieldValue>Fo</controllingFieldValue>

<controllingFieldValue>Fum</controllingFieldValue>

</valueSettings>

<valueSettings>

<valueName>Castle</valueName>

<controllingFieldValue>Fi</controllingFieldValue>

<controllingFieldValue>Fo</controllingFieldValue>

<controllingFieldValue>Fum</controllingFieldValue>

</valueSettings>

<valueSettings>

<valueName>Cow</valueName>

<controllingFieldValue>Fee</controllingFieldValue>

<controllingFieldValue>Fi</controllingFieldValue>

<controllingFieldValue>Fum</controllingFieldValue>

</valueSettings>

<valueSettings>

<valueName>Giant</valueName>

<controllingFieldValue>Fo</controllingFieldValue>

<controllingFieldValue>Fum</controllingFieldValue>

</valueSettings>

<valueSettings>

<valueName>Jack</valueName>

<controllingFieldValue>Fee</controllingFieldValue>

<controllingFieldValue>Fum</controllingFieldValue>

</valueSettings>
Step 5: Push the updated metadata file (Thing__c.field-meta.xml) into Salesforce using SFDX.
The file is now structured for Source Format. Everything after line 2 can be copied into line 39 of “Thing__c.field-meta.xml”. Be sure to remove any existing valueSettings elements before pasting in new values. After inserting the generated XML above, you’ll end up with the following complete Thing__c metadata file.
* Note: On Line 10, the controlling field has already been established, and we’ve inserted lines 40 to 70. Deploy to the Org using SFDX.
Thing__c.field-meta.xml
<?xml version="1.0" encoding="UTF-8"?>

<CustomField xmlns="http://soap.sforce.com/2006/04/metadata">

<fullName>Thing__c</fullName>

<externalId>false</externalId>

<label>Thing</label>

<required>false</required>

<trackTrending>false</trackTrending>

<type>Picklist</type>

<valueSet>

<controllingField>Fairy_Tale__c</controllingField>

<restricted>true</restricted>

<valueSetDefinition>

<sorted>false</sorted>

<value>

<fullName>Jack</fullName>

<default>false</default>

<label>Jack</label>

</value>

<value>

<fullName>Cow</fullName>

<default>false</default>

<label>Cow</label>

</value>

<value>

<fullName>Beans</fullName>

<default>false</default>

<label>Beans</label>

</value>

<value>

<fullName>Castle</fullName>

<default>false</default>

<label>Castle</label>

</value>

<value>

<fullName>Giant</fullName>

<default>false</default>

<label>Giant</label>

</value>

</valueSetDefinition>

<valueSettings>

<valueName>Beans</valueName>

<controllingFieldValue>Fi</controllingFieldValue>

<controllingFieldValue>Fo</controllingFieldValue>

<controllingFieldValue>Fum</controllingFieldValue>

</valueSettings>

<valueSettings>

<valueName>Castle</valueName>

<controllingFieldValue>Fi</controllingFieldValue>

<controllingFieldValue>Fo</controllingFieldValue>

<controllingFieldValue>Fum</controllingFieldValue>

</valueSettings>

<valueSettings>

<valueName>Cow</valueName>

<controllingFieldValue>Fee</controllingFieldValue>

<controllingFieldValue>Fi</controllingFieldValue>

<controllingFieldValue>Fum</controllingFieldValue>

</valueSettings>

<valueSettings>

<valueName>Giant</valueName>

<controllingFieldValue>Fo</controllingFieldValue>

<controllingFieldValue>Fum</controllingFieldValue>

</valueSettings>

<valueSettings>

<valueName>Jack</valueName>

<controllingFieldValue>Fee</controllingFieldValue>

<controllingFieldValue>Fum</controllingFieldValue>

</valueSettings>

</valueSet>

</CustomField>
Results
Success! The user will now see the picklists with the request controlling field. In the aforementioned scenario, our client asked us to make several changes to these picklists as the project progressed. Each time, Spinnaker was able to update all 700 controlling values within an hour of when the developer started work. It was so fast that the QA team asked how we accomplished the work so quickly and accurately, and the BAs referred to it as Spinnaker’s “magic.”
In the weeds
The technique discussed in this article is considered an all-or-nothing approach and does not rely on any pre-existing combinations in Salesforce. When attempting, it’s best to consider the Excel sheet your master list, so that you can QA against a known goal.
SFDX does not apply destructive changes to existing controlling values (valueSettings). So if Giant already has existing controlling values, and you want Giant to be unavailable for any controlling value, then you cannot make this destructive change via the metadata. Instead, for a simple “clean slate” approach, delete the Field Dependencies under the Fields & Relationships for that object. Then, the next time you push the metadata, it will load with just the new values. Following the clean-slate approach, Spinnaker wiped out our client’s old dependencies for each reload.
A warning about picklist values: Ensure all your values are loaded before starting the process. SFDX does not validate the existence of ValueName values in the ValueSetDefinition or the Global Value Set. If the valueName does not exist, it quietly continues without any notifications but DOES NOT load the controlling picklist setting. It doesn’t matter if your picklist is restricted or not.
Other applications
There are other applications for this process. Given that we have this master picklist spreadsheet, with each row specific to one of three record types, Spinnaker has been able to adapt the above process to create a list of picklist values available to each of the record types and load them without ever using the UI. Spinnaker “magic” times two!
…and other Excel secrets
The above is just an introduction to XML and Excel. We can also apply some of these new skills to check our work. For example, Excel can Import and Map directly to “Thing__c.field-meta.xml” and can be refreshed by right-clicking on the table. In addition, it’s possible to use Excel’s vLookup or Power Query to reconcile any differences between the master spreadsheet and the metadata.
If you have any questions about Spinnaker Support’s Salesforce Service offerings, don’t hesitate to contact one of our representatives for more information.